 I’ve seen many folks being only worried about the fact that they need to pick a beautiful color for their floors to go for laminate flooring.
However, the combination of laminate and underlayment needs to be selected wisely, and that’s one choice-making area you need to focus more. The visible and non-visible surface both needs to be in optimal condition. So, it’s very important that you mull precisely over the entire installation process.
Today, we’ll be talking about a very important topic. And it’s regarding how to install underlayment for laminate flooring on concrete. Keep on Reading!
How to Install Underlayment for Laminate Flooring on Concrete: Picking the Right Underlay & Installation Process
There’s a long list of things you need to do before, during and after such kind of installation. Having complete focus on process as well as researching prior to the event are important keys here. So, make sure you fulfill both conditions with dedication. Let me help you a bit more deeply below by discussing the basics you ought to know.
Underlay Recommendation
Before you start sweating over the actual process, there’s something we need to talk about. And it’s about the finest underlayment for laminate you need to pick. What could possibly be the best one for concrete, thought about it?
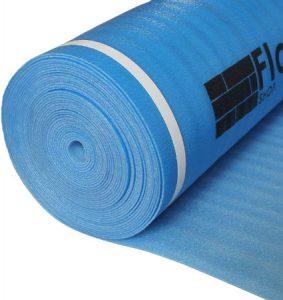
Well, if no then here’s advice. Go with 2 in 1 vapor barrier underlayment. This is probably one multipurpose type that syndicates both standard underlayment sealed with fine moisture preventing barrier attached beneath. Great right? You’ll enjoy double benefits, safety, and support with these.
There’s no worrying about dampness causing trouble to your flooring with these. If there’s any chance of moisture breaking through sub-floor, you must pick these. Apart from laminate flooring, this also helps with other engineered wood floors.
Starting Note for Installation
We’re about to walk through the actual installation process. You need to have all the necessary tools and supplies ready. Make sure you are not confused over the project. If possible, go through good research before trying actually.
Another advice I must give is regarding prior to the installation. You must ensure the climate is controlled for at least 2 days of a time period. The room temperature should be at a minimum 65-degree Fahrenheit. Also, make sure there’s not more than 65% of relative humidity.
You are going to need the underlayment, flooring, tape and utility knife or scissors. Also, you may require concrete grinder, level, moisture test kit,
Clearing & Prepping the Area
The surface needs to be generously prepared before installation. Here you need to ensure four requirements to continue.
The floor needs to be clean of any old flooring wax, oil or paint. You should also deal with seals and other debris. There should be no heavy burnishing or troweling. The floor should also not be slick. You can try some concrete grinder to get rid of any sort of coating. The surface will also become a bit rough this way. And that is going to help greatly when using adhesive. If you are using a floating floor that is not attached to the subfloor, you need to make it clean as well.
After cleaning you need to do some leveling as well. Use a long level or tape for this task. The leveling should be something like 3.16 inch uniformed within every 10 feet. Using the concrete grinder make sure to get rid of any high spots. Using a cementitious leveling compound, you also want to fill low spots.
You need to check the moisture level. Use a moisture test kit if possible. If moisture seems off with manufacturer’s recommendation, the dampness needs to be reduced. If the subfloor has wood on top concrete, both need testing.
The concrete needs to support installed flooring, furniture and people in that area. It’s really important you assure structural soundness for this reason. There should not be any crumbling or cracks disturbing the floor.
Also, you need to try this on a concrete floor that is at least one month old. You can try the calcium chloride test. The maximum reading in this check should be 5 pounds/1 day/1k square feet.
Cutting Underlayment for Installation
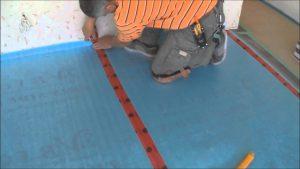
Once you assure the preparation, repairs and inspection steps, it’s time to start actual function. The 2in1 underlayment usually includes a roll. On one side of the roll, you’ll notice an overlap. Start with unrolling the underlayment to around one width. The film (yellow colored) should face the subfloor. And this means the overlap will be facing wall’s opposite side.
As soon as you finish rolling underlayment from one wall to another, time to cut the first section. Make sure to measure before making a cut. Experts always recommend measuring twice while cutting once.
Flooring Addition & Rolling Out New Underlayment
As soon as you start moving forward with underlayment, add flooring. Once you reach at least one-foot distance, stop flooring installation. This measurement should be from the underlayment’s edge.
Now you need to proceed with unrolling another section. Make sure you do this right up against the before installed section of underlayment. Follow the same tactic, you need to measure and cut accordingly.
You may want to proceed with laying down the entire underlayment at once. But this is not the right way. If you consider having entire control over this project is important, then don’t lay all at once. So that it will end up in giving a seamless and moisture preventing the connection between every two sections.
Attached Overlap & Tape Seam Process
You should always install the following row on top of overlap. Do this when unrolling rows. Overlapping from foam edges is unfavored. If you use the attached overlap, then chances of creating seamless moisture seals increases. So, the rows have better installation results this way.
You need to seal the rows together. Use packing tape for that. This will ensure that the 2in1 vapor barrier underlayment stays in place and keeps functioning right.Keep repeating the process until you reach all areas. And after some hard work, you’ll have the installation done beautifully… Enjoy the Results!
You may also like to read : Do I Need Underlayment for Laminate Flooring on Plywood?

Conclusion
Depending on the laminate planks and tiles you pick, installation process will always vary. You need to have access to proper instructions and guidelines to complete the job correctly. There’s no need to get overwhelmed.
If you know the right way on how to install underlayment for laminate flooring on concrete, end results will certainly be beautiful.
Don’t try installing this if you have less idea about the installation tools or steps usually. You can hire someone who is professional at doing these jobs for small pay. Also, expert touch will make the end results really admirable which is worth every penny.
This is Autem Decker. Main Author of ‘TheHomeDigs‘. You may not find her on the list of top 10 contemporary Canadian interior designers, but everyone who knows her says she was born to be an interior designer.
She makes her plan in her head and draws them in her years-old diary with a note in the corner. The way she plays with color and shape amazes us.
Connect Her On – Twitter