Here’s what seems to have happened. For some reason, you have discovered issues on the plank in your hardwood flooring.
Now to fix that thing, you thought that fillers would be enough. But nope! The situation has become quite severe and now you must change the problematic planks with new ones.
And from that point, begins a chapter of another misery. Because you simply don’t have any clue on how to replace hardwood floor planks.
Not anymore. I will try to sum up a small guide right below, that should be enough for you to get out of the situation.
Here’s How to Replace Hardwood Floor Planks
To replace a damaged plank, you first need to understand how they attach to each other there and then get those out to bring new ones. Usually, it uses the tongue and groove fitting method to attach.
It’s something that if you don’t know about, you’ll quite surely end up damaging neighboring planks while trying to get problematic ones out. And so, don’t be tempted, sit for a while, and give this whole thing a read.
Supplies That You’ll Need:
- Trowel
- Miter saw
- Circular saw
- A rubber mallet
- Flathead screwdriver
- Oscillating multi-tool with accessory
- Crowbar
- Adhesive towel
- Flooring adhesive
Cut The Plank Seams
The first thing to get done is cutting along the seams of planks. You’ll need a basic circular saw only. Also, make sure you keep things inside the end of planks. By somewhere half an inch.
Cutting all way through the plank is very important, so don’t miss that part as well. Once you are done, move to the plank center. And cut across that area. This will basically make an H-like shape with both previous cuts.
Now you can keep the circular saw aside and grab oscillating multi-tool. Go over all those previous cuts with this tool. So that the cuts are assured to be gone down where the subfloor is.
Lift The Plank Portion to Make Gap for Crowbar
The flathead of the screwdriver, you want to wedge it inside the center cut exactly. Then gently tap it downwards. Use the rubber mallet to tap properly. Don’t just tab or pry. Instead, work with a combination of both.
You want to tap for a while and then pry the next moment. This will make a portion of the plank lifted upwards. The aim here is basically to have enough huge space to accommodate the crowbar end.
Once you manage to get that much gap, get the end easily inside. Now tap on the crowbar and apply a tad bit more leverage in prying those pieces of plank upwards. With the continuous hammering and prying, the crowbar will eventually allow you to carefully get the plank pieces out.
And this is what you’ll do with all those problematic planks that need to be removed. Take your time getting all of those out, avoid being too hasty. The removal process often becomes a disaster simply because the person in charge of removing loses patience and tries getting them out by force and too quickly. Don’t be that person.
Scrape Old Glue to Apply Newly
Once again, you’ll be needing that osculating multi-tool. Use it for scraping up the dry glue. You want to cut through them if scarping seems hard. It could be sometimes holding plank pieces and not allowing you to remove them easily. Once the old glues are out of chat along with the planks, the spot is pretty much ready for fresh glue to settle down.
Cut Planks for Replacement
The new planks that you’ll place need to be a certain dimension for fitting properly. For that, you must measure the length and mark it on the new piece. Then use the miter saw to cut it into the right measurement.
In case of going with a whole plank, you still need to do some trimming down. And this must be on the tongue or bottom groove. So that there’s no issue for it to fall in the place just right.
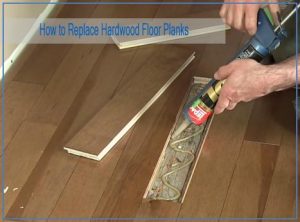
Fixing The Plank
So, the new planks are cut and ready to get attached. Open the new wood glue, check and confirm that it’s not spiriting or dried out already. It should be fresh. Now carefully apply the glue and spread it nicely.
The coating should be even. And the subfloor must be covered nicely from edge to edge. Once you place the plank, gently tap over it. Use the mallet. Of course, the rubber side will be enough for tapping.
Don’t go for a powerful hit. Instead, work with frequent gentle taps. The plank will start to settle in place gradually. And you may see some of the applied glues coming on top of it. Use a regular paper towel and wipe the excess glue off from the plank top.
After that, you want to use multiple adhesive remover towels and work on all those same areas once again. You need to wipe the residue with a regular paper towel.
The surface having any haze from the glue will be easily visible to you through this step. And if there are, you can basically repeat the process until the thing is settled.
Now use your hands to press down the plank. So that it can work with the glue and fix it into place. You want to tap with a rubber mallet right onto the plank’s center. This is the seam’s location and it helps to make them uniform basically.
For the rest of the night, place a heavy object on top of this newly fixed plank. The weighing down will help it to settle better. And you are done with the process.
Can You Replace Engineered Hardwood Floor Planks?
This usually comes with tongue and groove planks. By removing the new plank’s tongue, you would be able to install it into the flooring easily. If you want to replace glued engineered hardwood floor planks, then use a wood chisel to carefully get tongues out of the new board and get it fit there basically.
Wrap Up
And that was how to replace hardwood floor planks without damaging the neighboring ones. It isn’t a very complicating task to get done. But it surely demands some time and patience. As you need to go through each plank and cut through glues carefully taking a long time. So don’t worry about messing things up, as long as you are willing to carefully handle the replacement. Good Luck!
This is Autem Decker. Main Author of ‘TheHomeDigs‘. You may not find her on the list of top 10 contemporary Canadian interior designers, but everyone who knows her says she was born to be an interior designer.
She makes her plan in her head and draws them in her years-old diary with a note in the corner. The way she plays with color and shape amazes us.
Connect Her On – Twitter