
No matter how well it was installed in the first place, we all know how important it is to adjust the door closer time to time.
Sometimes it’s a little change in the weather, the latch is slightly worn out, the sweeping pressure is out of control for one certain member; these problems just never seem to go away!
Adjusting the door closer, however, solves all these door-related problems for good. And you’re already aware of this fact. ‘Cause obviously you wouldn’t be reading these lines right now if this is not what you were going for.
Whenever it comes to adjusting mechanical stuff, most people start panicking thinking of all the feasible screw-ups they might cause and then retreat in order to avoid it.
We don’t want you to feel the same. Adjusting door closer is a bit complicated, but not that hard. All you have to do is follow some easy steps and adjusting it will be a matter of no time.
Read: How to install a screen door closer
Things You’ll Need To Screen Door Closer Adjustment
A Stool or A Ladder: Even if you’re tall, you’re not tall enough to see what’s going on up there. Yes, you need a medium to reach the closer.
A Piece of Cloth: It is a must to wipe off the filth or fluid stain from closer parts.
Hex Wrench: You’ll need one to adjust all the screws.
User Manual: If you still have it somewhere, keep the manual near while working. You might need to take a look at it at some point to get a hold of the system.
Step by Step Guide to Adjust the Door Closer
First Step: Reach the Closer
It’s no surprise that the closer is mounted on the top frame of the door and your body is always going to fall short for this no matter how tall you are. So, obviously, you’ll need a medium to help you work on the closer like a decent being.
You can do it with a high stool, still we’ll suggest you use a ladder. Why? Because climbing a ladder will give you the chance of working from a position that favors you the most.
Besides, you might need to go a few steps higher or get a little lower sometimes, stool doesn’t provide you with such a privilege. However, the choice is totally up to you. Your comfort, your decision.
Now, take the necessary equipment and hop on the stool (or the ladder, whatever you’re going with) to start adjusting the closer.
Second Step: Remove the Cover
For utmost protection, the door closer is certainly going to have a cover over it. So, in order to adjust its systems, you got to remove the cover first.
Door closers usually come with two types of cover. Some manufacturers include fastening straps so that the cover stays in its place all the time regardless of the situation it’s going through. Otherwise, they use a cover that fully relies on suction energy.
If your closer’s cover happens to include fastening straps, don’t try to unfasten it. The cover has to be constructed in a way that will let you do your work without needing you to utterly open it.
If your cover doesn’t include a strap and can be opened just like that, take the whole cover off to reach the system. By the way, don’t forget to check for leakage when you’re on it. If there’s a leakage, the adjustment isn’t going to solve anything.
However, sometimes manufacturers don’t bother to include an extra cover for those closers. In this case, skip this part and get down to the actual business of closer adjustment.
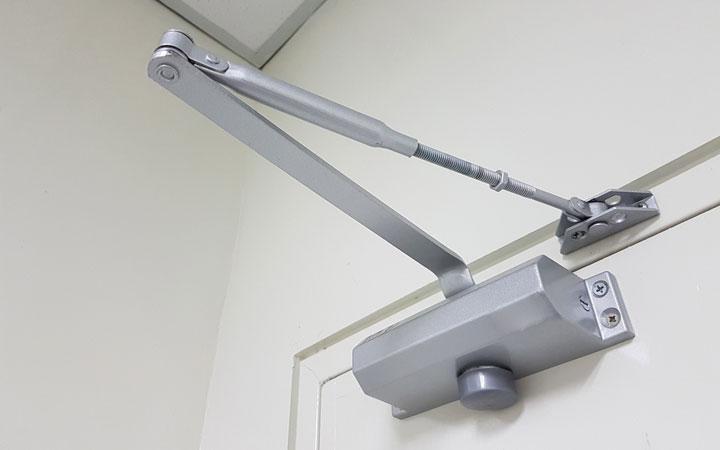
Third Step: Recognize All the Parts
The first condition of adjusting a system is to know what you’re dealing with. Since these parts are crucial, you can’t risk messing with any of the screws involved. In order to make the right adjustment, you have to first understand which part goes where.
Don’t panic, you won’t have to obtain a degree on mechanical engineering for that. For customer convenience, manufacturers often mark the parts so that people can tell them apart. If not, you can always turn to good ol’ user manual or Google for that.
Fourth Step: Go by Your Preferences
You’re adjusting it to match certain preferences of yours, right? Or even if you didn’t decide something beforehand, you should run a quick calculation in your head now to make the proper adjustment.
How fast you want it to shut down, the pressure you prefer for opening; decide that before adjusting those screws. This way, you’ll be able to understand how much effort has to be put there or when you should stop.
Fifth Step: Adjust the Screws
Now, take the wrench and start adjusting those screws. The whole closer’s movement depends on three things: latching, sweeping speed and back check. Adjust screws that control these stuffs.
And, yes, only turn and adjust. Closer relies on hydraulic fluid pressure for movement. Don’t try to unscrew, unscrewing will lead to a hydraulic fluid leak and ruin the whole closer’s system for good. Be very careful about that part.
For decreasing shutting speed, turn the screws clockwise. Turning them anti-clockwise provides the door with faster pace for shutting; so go easy with anti-clockwise adjustment. You don’t want your door to brutally slam shut on the frame, do you?
Sixth Step: Check for Assurance
After adjusting the system matching your preferences, get off the stool/ladder and test the door’s motion. Open and shut it slowly several times to see how fast or slow it moves.
If it doesn’t fail to give you the outcome you wanted every time you check the motion, you can put aside the stool/ladder and wrench. Your job here is done, the closer is now well-adjusted.
My Two Cents on the Matter
However, if the adjustment doesn’t turn out how you expected it to be, turn the screws again clockwise or anti clockwise to find the right place.
Keep in mind, sometimes the door doesn’t shut properly due to some flaws of its own, the closer has nothing to do with that. In this case, the circumstance won’t change no matter how accurate adjustment you make on the system. Door replacement is the only solution to this problem.
So, if your door isn’t flawed and doing its duty better than before, you can rest the adjustment task for good.
You may visit this link to know more on How to Adjust Your Door Closer – Dengarden
This is Autem Decker. Main Author of ‘TheHomeDigs‘. You may not find her on the list of top 10 contemporary Canadian interior designers, but everyone who knows her says she was born to be an interior designer.
She makes her plan in her head and draws them in her years-old diary with a note in the corner. The way she plays with color and shape amazes us.
Connect Her On – Twitter
I always forget to close the door to my garage, and that leads to my dog getting over there. I don’t want him to get sick from all of the oils and chemicals that are in there, so I want to keep him out. A door closer seems like a great way to ensure that the door doesn’t get left open anymore. I’ll make sure that it’s properly calibrated when it’s installed.